PowerShell Studio is more than just a script editor; it's actually a complete environment, including dozens of built-in tools and functions to make scripting more efficient. However, at the heart of PowerShell Studio, is the industries' most powerful and flexible code editor. While it's easy to start using PowerShell Studio's editor without any training, a number of its most efficient and effective features can be easily overlooked. In this chapter, you will learn about all of the core editor features within PowerShell Studio, as well as a number of tips for using PowerShell Studio more efficiently.
PowerShell Studio includes a number of aids that make script editing easier.
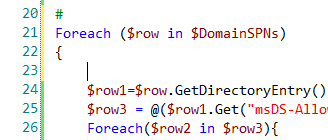
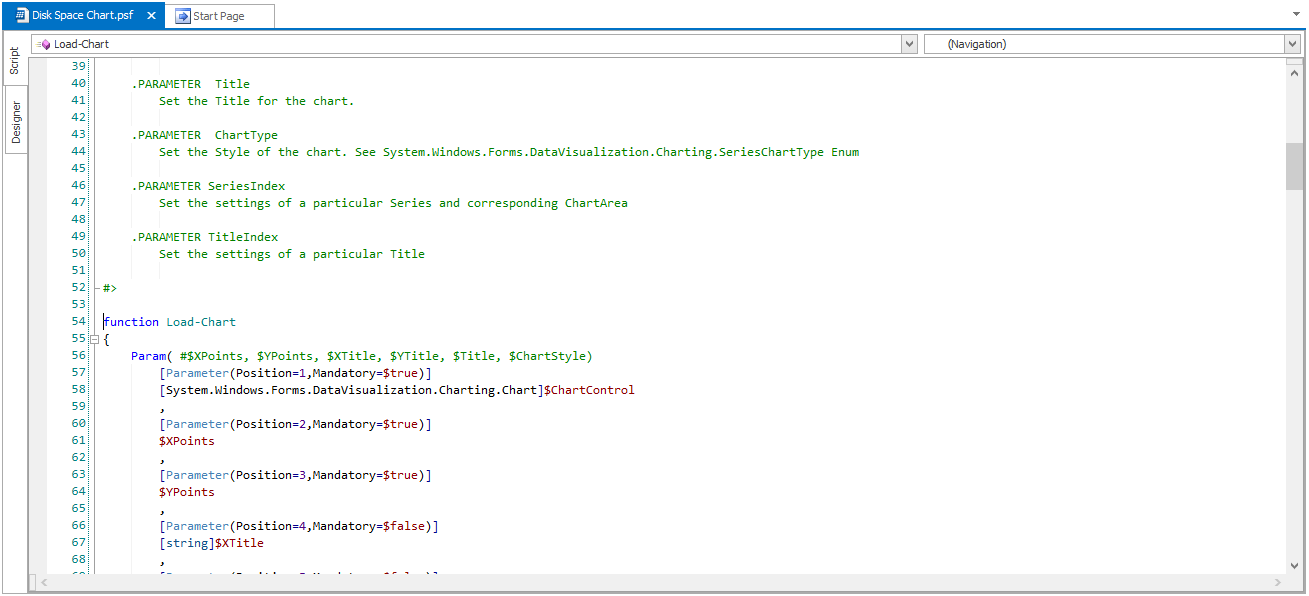
Line numbers are always displayed on the left hand edge of the editor panel. The colored bar on the right of the line numbers indicates the edit status of your code.
Lines marked with green have been edited and saved since you opened the file. Lines marked with yellow have been edited but not yet saved. Lines without a color have not been edited in this session.
PowerShell Studio also highlights pairs of brackets in gray. When you click on a bracket, its partner will be highlighted. This applies to all brackets - {}, [] and ().
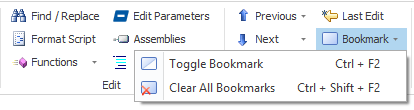
There are a number of ways to toggle a bookmark on or off, with the cursor located on the line where you want the bookmark, or where a bookmark exists:
Bookmarks are displayed as boxes next to the line numbers in the code editor window, as shown below:
You can also quickly jump to the previous or next bookmark:
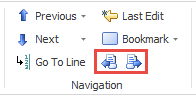
Aside from bookmarks, PowerShell Studio provides a few other shortcuts to quickly move to different locations in your script. These functions are accessible from the Home tab of the ribbon:
You can also find a navigation bar above the editor, which allows you to jump between functions, workflows, events and more.
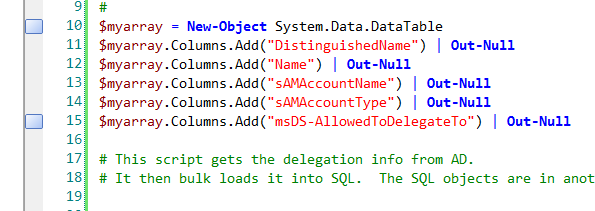
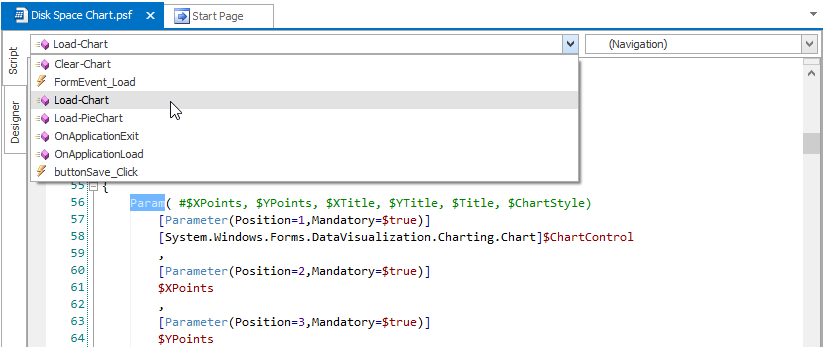
The function combo box on the left shows you the context of the caret position:
Use the function combo box to jump to specific a function, event, workflow or configuration:

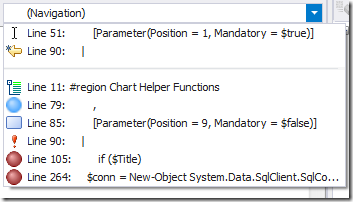
The navigation combo box on the right allows you to jump to specific positions that include the caret position, the last edited position, current debug position, breakpoints, tracepoints, bookmarks, and syntax errors:
For your convenience, the drop drown provides a preview of the line contents in order to help direct you to the correct position.
PowerShell Studio provides the expected Copy, Cut, and Paste clipboard functionality.
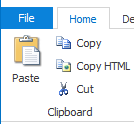
This is accessed via the Home tab on the ribbon bar, or by using standard Windows keyboard shortcuts (CTRL-C, CTRL-X, CTRL-V). It can also copy selected text onto the clipboard as HTML, ready for pasting into web applications.
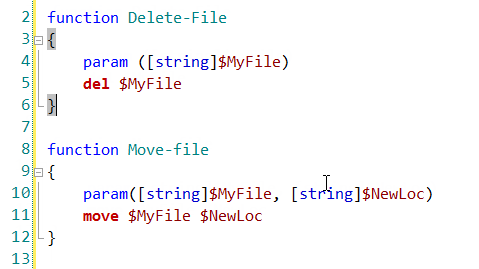
Code folding is a feature that allows you to collapse or expand sections of your code. Collapsing sections of code in a long script makes it easier to focus on the section you're currently working with.
PowerShell Studio automatically creates foldable regions from declared functions and comment blocks.
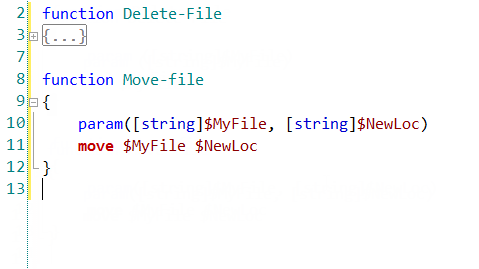
When collapsed, PowerShell Studio properly displays line numbering, accounting for the lines contained within the collapsed (or folded) region. This ensures that line number-based error messages and other information remain accurate.
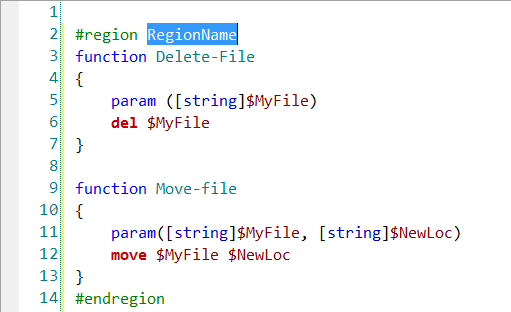
You can create a persistent region, one which is maintained even if the file is opened and closed, by highlighting a block of code and pressing Ctrl+Shift+G. This creates a named region with the default name "RegionName", highlighted and ready for you to edit.
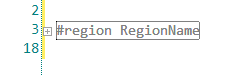
Named regions are convenient because, when folded, the name remains visible, reminding you what the region contains.
You can also create a named region manually simply by specifying the #region and #endregion keywords on comment lines within your script.
NOTE: It is also possible to create regions inside regions i.e. nested regions.
Right clicking in the code editor window and choosing the Outline option will display the following menu of options for working with regions:

PowerShell Studio includes extensive, powerful search and replace features, allowing you to revise a file's contents quickly and easily.
Basic searching is most easily accomplished by selecting Find/Replace from the Home tab of the ribbon bar or by pressing Ctrl+F.
The find/replace dialog allows you to specify parameters for the process.
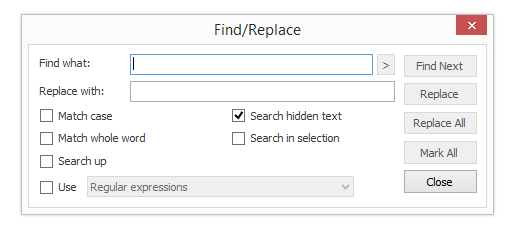
This dialog allows you to customize the search process. The options are:
The Find dialog will stay open while you edit your script, and you can click Find Next to find the next occurrence of your search string. Clicking Mark All will place a bookmark at each location where your search string occurs; you can then use F2 and Shift+F2 to move back and forth between bookmarks.
If you provide replacement text as well as search text you can use the Replace and Replace All buttons to make changes in your script.
NOTE: Replace always operates on the whole script regardless of whether any code is highlighted or not, unless the "Search in selection" option is checked.
PowerShell Studio's Find and Replace functionality includes the ability to search for regular expressions. For example: The regular expression "^[ \t\s]*$" matches a blank line. This regular expression (or any other) can be used in the Find or Replace text boxes in the Find/replace dialog simply by selecting the Regular expression checkbox.
Enabling regular expressions also enables a helper menu next to the Find what: textbox:
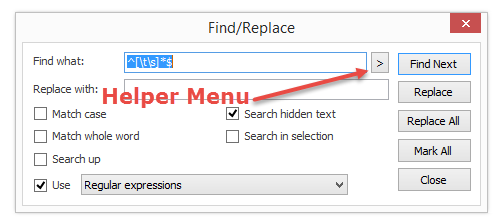
You can use this to quickly add regular expression components to your search text.
PrimalSense is SAPIEN's brand-name for our powerful, flexible, code-hinting and code-completion feature.
PrimalSense is similar in functionality to features such as Microsoft IntelliSense, which is found in Microsoft's Visual Studio products.
PrimalSense works automatically in most cases, providing several distinct features:
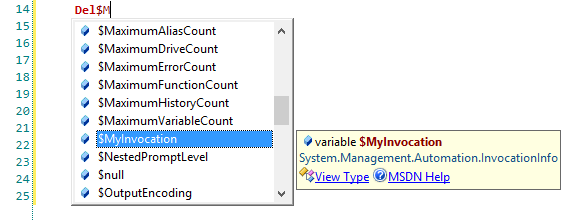
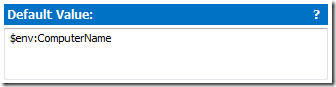
This also includes a number of standard PowerShell variables including:
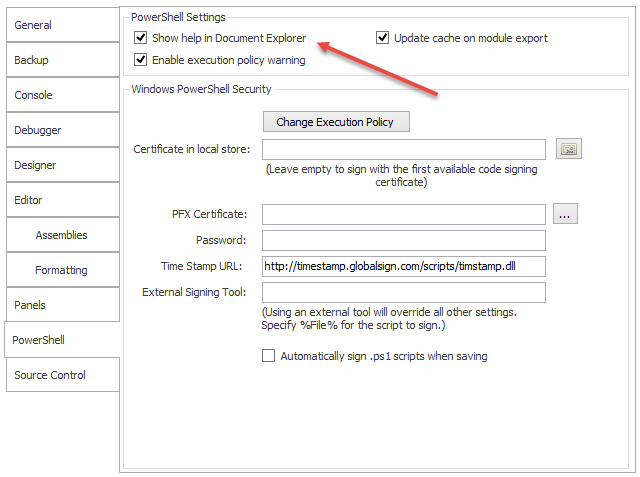
If you find it more convenient to view help information in a separate window, you can reconfigure PowerShell Studio to use the SAPIEN Document Explorer instead of the Help panel.
To do this, click on the Options button on the ribbon bar and choose the PowerShell tab of the Options dialog. Then click Show help in Document Explorer.
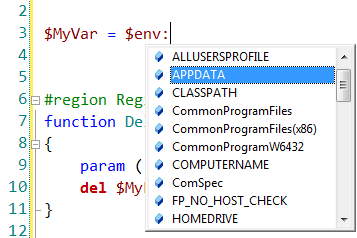
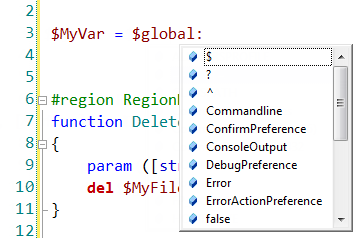
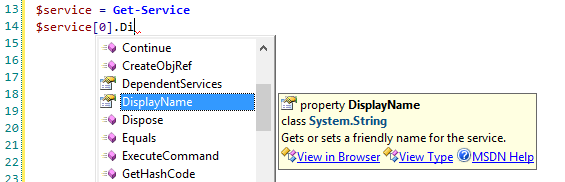
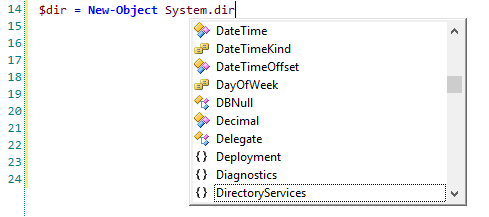
Press [Ctrl + Space] to bring up the PrimalSense:
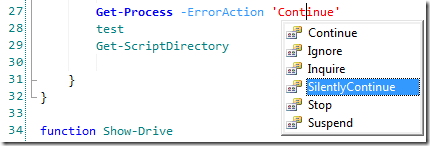
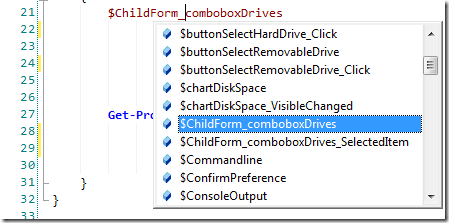
The PrimalSense will list the appropriate items depending on the context.
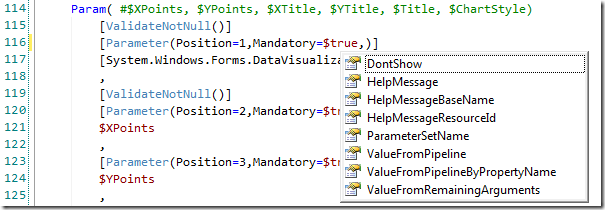
PrimalSense for parameter attributes:
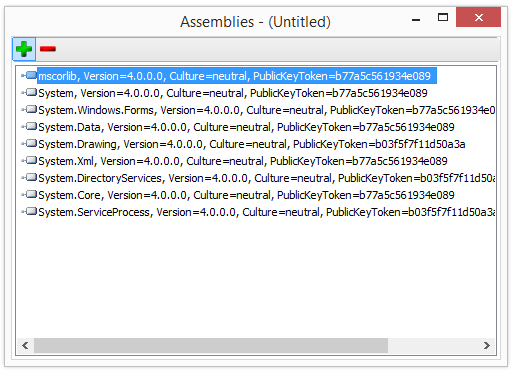

If the assembly is not added to PowerShell Studio, PrimalSense cannot provide any help. In the screenshot below, PrimalSense cannot offer any help because
the assembly System.DirectoryServices has not been loaded.
If an assembly is removed from a machine, PowerShell Studio will not be able to load it the next time it starts.
The assemblies dialog indicates this by putting an exclamation point next to the assemblies that could not be loaded, as shown below:
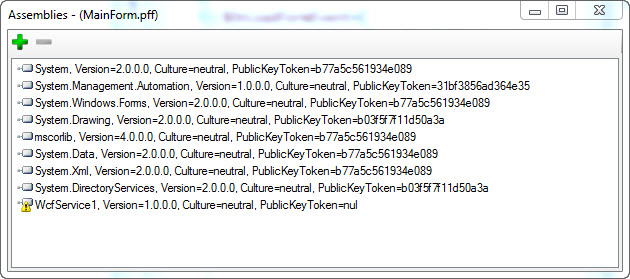
This may occur when a referenced assembly is deleted.
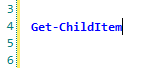
If you type a known PowerShell alias in the editor window and then press Tab, the alias will be expanded into the full Cmdlet name.
For example, the following alias is typed into the editor:
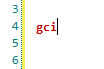
Pressing the Tab key expands the ps alias into its full cmdlet name, Get-Process.
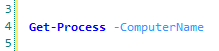
In a similar fashion, PrimalSense will expand parameter aliases into full names.

Pressing tab after the parameter alias Cn expands it into its full parameter name ComputeName:
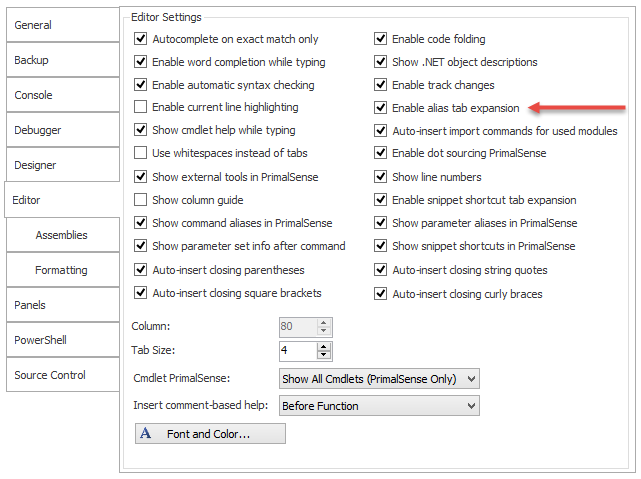
Alias expansion is controlled by the setting the Enable Alias Tab Expansion in the Editor tab of the Options dialog. It can be enabled or disabled.
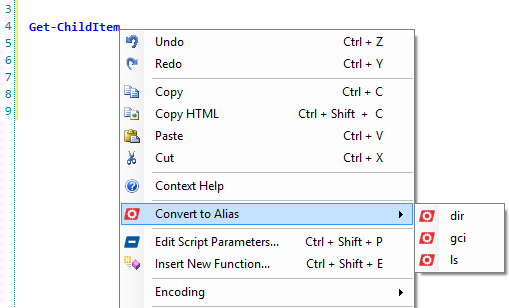
You can also covert a full Cmdlet name into an alias by right clicking on the Cmdlet name in the code editor, and choosing 'Convert to alias'. If a Cmdlet has more than one alias, PowerShell Studio will list them, and you can choose your preferred one.
PowerShell Studio provides two keyboard shortcuts for working with aliases:
NOTE: Aliases are great for minimizing the amount you need to type in the shell. When you are writing scripts however, it is best to expand all of the aliases. This makes it easier for less experienced colleagues to understand your scripts, and greatly facilitates debugging.
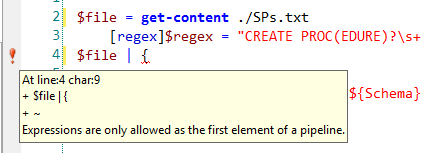
PowerShell Studio constantly analyzes the code you type. If it finds a syntax error, it will display a red exclamation point (!) on the left edge of the code window, next to the line with the error. If you hover over the exclamation point, a tool tip containing information about the error will appear.
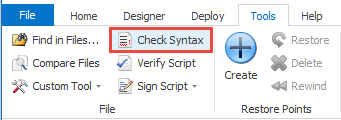
You can also invoke the syntax checker manually by pressing F8 or pressing the Check Syntax button in the File section of the Tools tab of the ribbon bar.
PowerShell Studio provides an extensive collection of code snippets. You can access these directly from the Snippets Panel.
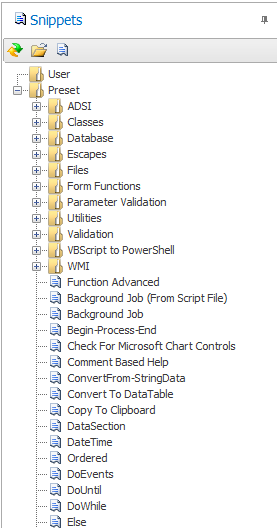
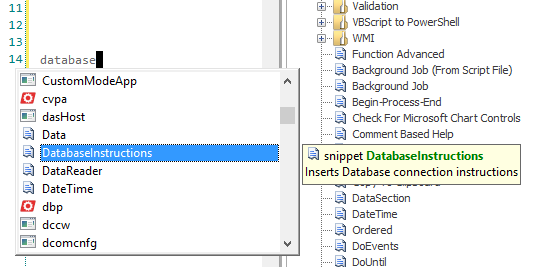
There are three ways to insert snippets into your code:

You can also create your own snippets or edit the existing ones by using the Snippet Editor described in Chapter 16.
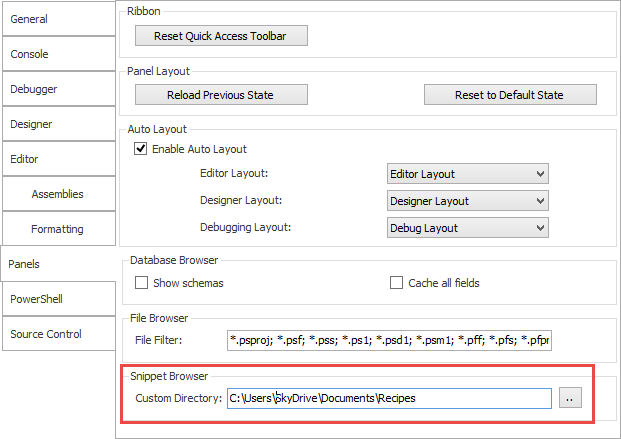
Snippets are stored in "AppData\Roaming\SAPIEN\User Snippets\PowerShell". You can add an extra root folder to the snippet browser by specifying a path in the Panels tab of the Options dialog. The path is specified in the Custom Directory property, and the path can specify a network share as well as a local directory.
Script signing is the process of adding a digital signature to scripts. PowerShell Studio can automate this so that scripts are signed when saved or exported. To enable signing, go to the PowerShell tab of the Options dialog.
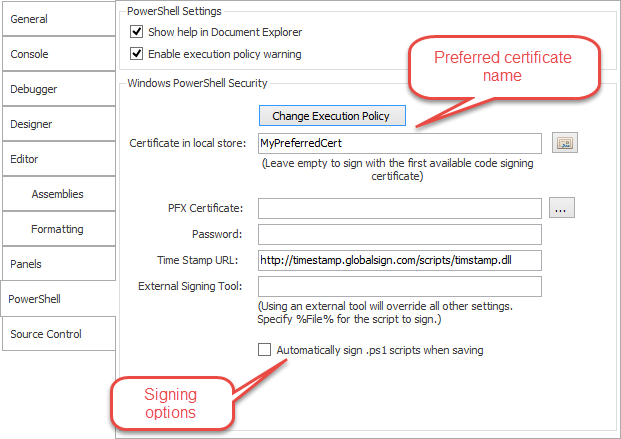
The option at the bottom of the dialog enables or disables automatic script signing. In addition, you can select a preferred code signing certificate by entering its name. PowerShell Studio also supports pfx format certificates.
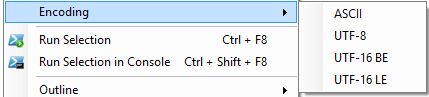
File encoding can be modified by right clicking on the code editor and opening the Encoding menu.
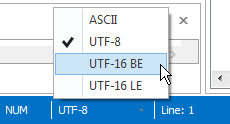
Or you can modify the encoding by using the status bar encoding menu.
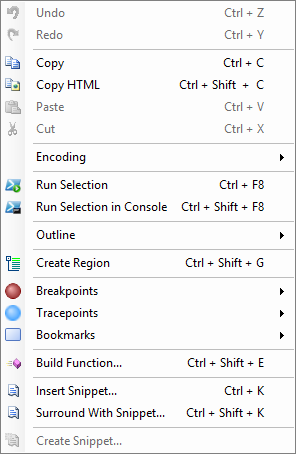
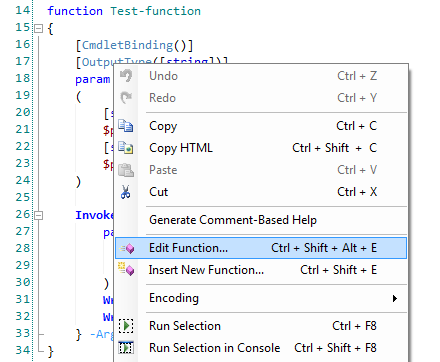
Many of the functions described in this chapter can also be accessed from the code editor context menu.
Right click on the code editor to display this menu and access common operations instead of using the ribbon bar.
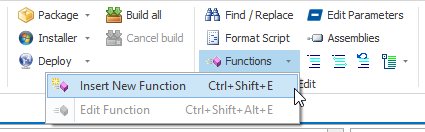
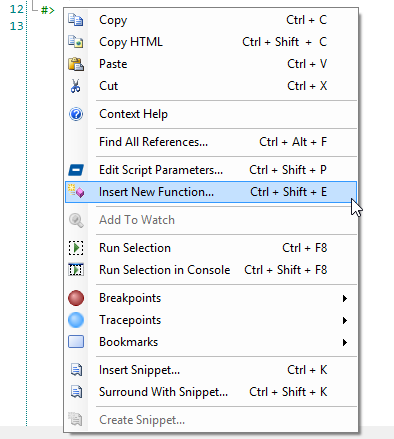
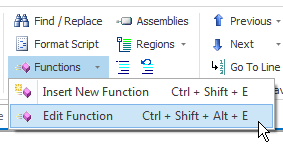
The Function Builder introduces a quick and easy way to create complex functions. It is a time saver and a learning tool for those who may not be familiar with the intricacies of creating an advanced function. There are three ways to open the Function Builder
All three options will display the following Function Builder start-up screen:
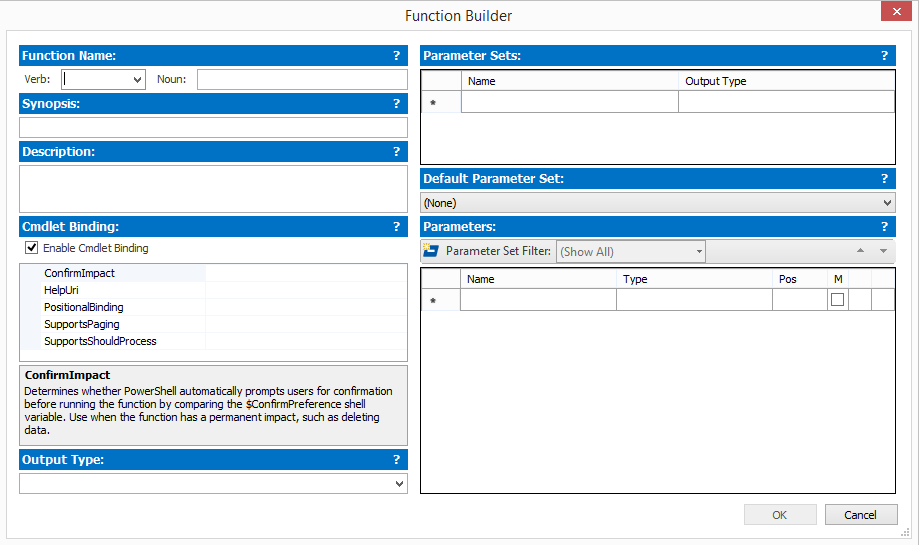
Notice the question marks? If you hover or click over a question mark, a help message will popup explaining the respective field.

Now let's explore each field of the Function Builder, and learn how to create a function.
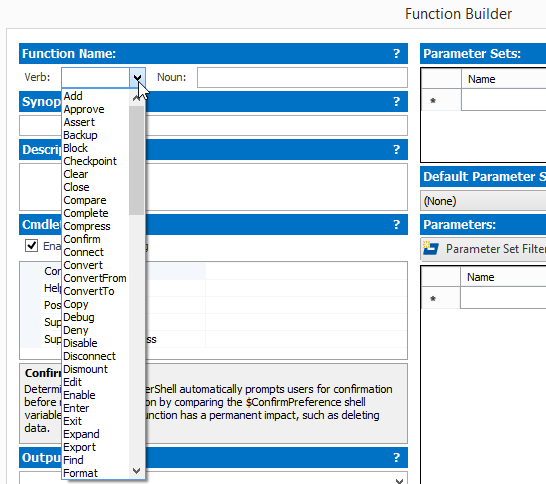
The Function Builder provides you with a verb and noun field. The verb field contains a combo box with a list of approved verbs, but you have the option to enter your own unapproved verb if necessary.
Here, you have the option to enter a quick synopsis and a longer description using these fields. The information provided here will be used to generate the function's comment-based help.
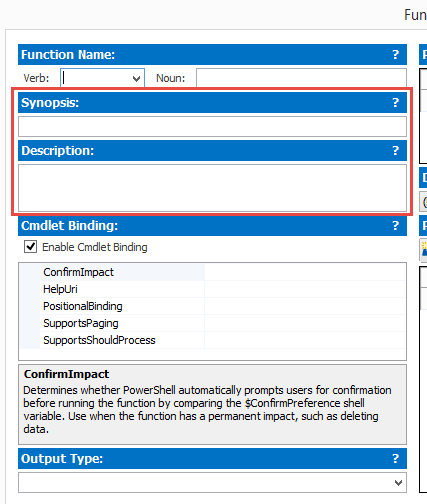
Check the "Enable Cmdlet Binding" option if you want your function to behave like a cmdlet and take advantage of PowerShell's built-in parameters such as Debug and Verbose and/or process input from the pipeline.
This option will add the [CmdlingBinding] attribute to your function:
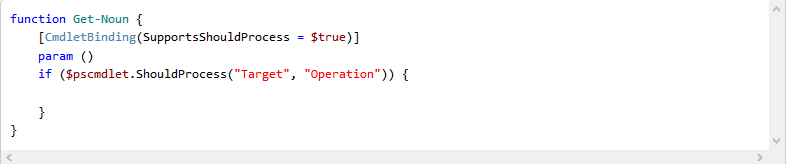
You can set the cmdlet binding attributes by using the properties grid:
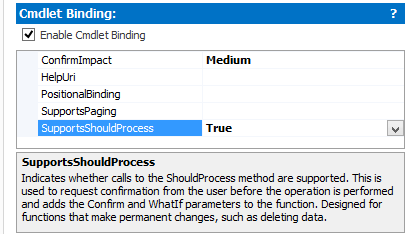
The property grid provides a help description of each attribute.
The function builder allows you to specify multiple parameter sets, including a default. Once you define a parameter, you can assign it to each individual parameter. It also allows you to specify an optional output type for each parameter set you define.
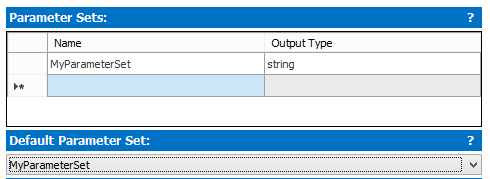
You can specify the output type of the function and the appropriate attribute will be added:

The output type field also allows you to select from existing types:
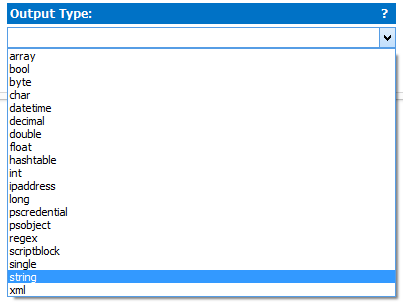
The output type field also provides code completion for namespaces and types.
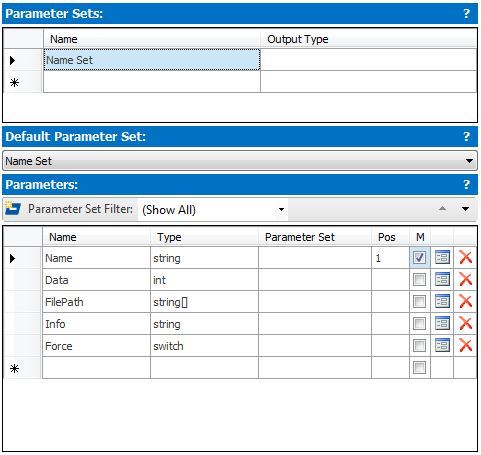
When a parameter set is defined, the Function Builder reacts accordingly. For example, the Parameter Set Filter is enable and a Parameter Set column is added to the Parameters list.
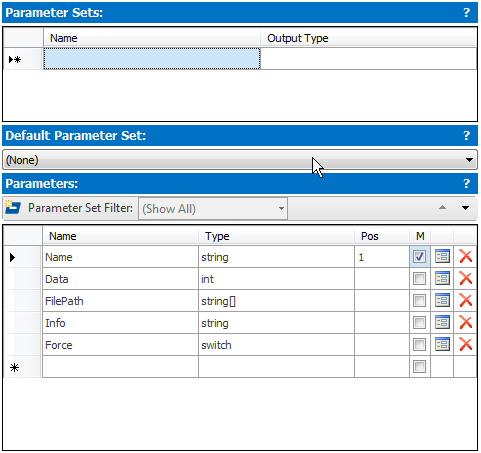
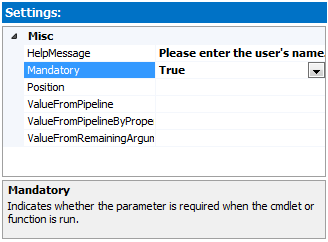
The function builder makes adding a parameter as simple as typing in a name. The grid of parameters, allows you to mark the parameter as mandatory, provide a name, parameter type and assign a property set. If needed, you can press the Details button or press (Ctrl + E) to open the parameter editor for more advanced settings.
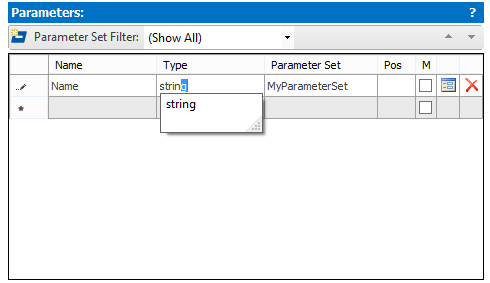
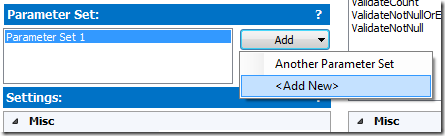
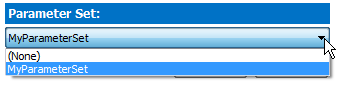
You can also define a new parameter set within this field:
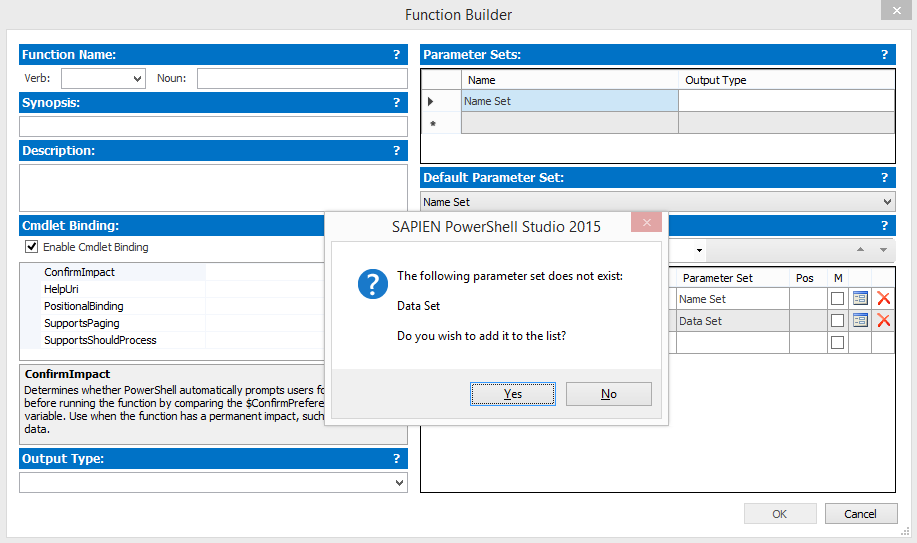
Multiple parameter sets can be assigned to a single parameter by using a comma separator.

The Pos column is an optional field where you can quickly define the parameter's position attribute. By default, the parameter's position is determined by the ordering of the parameters.

For parameters that are assigned to multiple parameter sets, you can define each position by using a comma separator. The position values should follow the same ordering as the parameter set assignments. Of course, you can also assign the parameter's position and parameter sets using the parameter's editor dialog by clicking the edit button:
![]()
The Parameter Set Filter allows you to either show all the parameters, only show the parameters that are not assigned to a parameter set, or only show parameters within a specific parameter set.
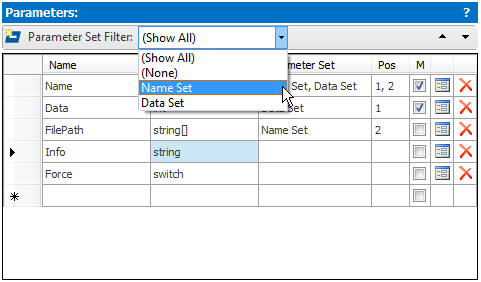
Selecting a filter other than "Show All", allows you to work within that specific parameter set.
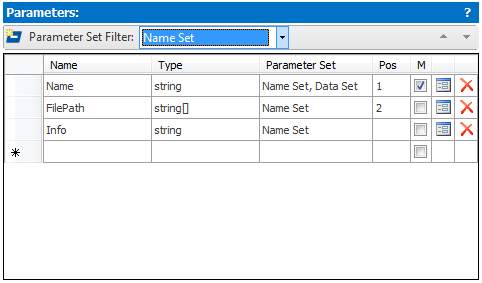
While in this mode, you can use the up and down menu buttons to move or swap the parameter positions. For your convenience, the position field now only shows the parameter's position within the selected parameter set and no longer lists the other parameter set positions when a filter is applied.
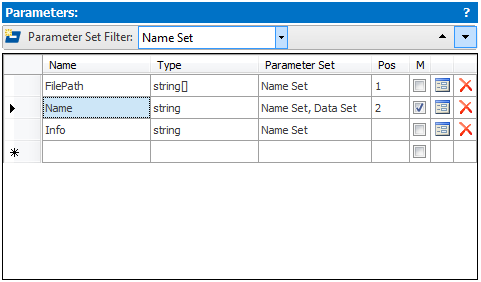
By default (Show All filter) the up and down move button only changes the order in which the parameters are declared in the function.
NOTE: In the Show All mode, the Mandatory check box refers to the parameter's first assigned parameter set.
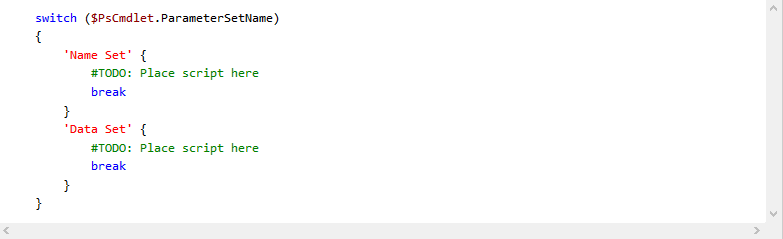
When a parameter set is declared, the generated function will now include a switch statement to help you differentiate between the parameter sets:
As lightly touched on earlier, pressing the New Parameter button or the Details button will bring up the parameter editor:
![]()
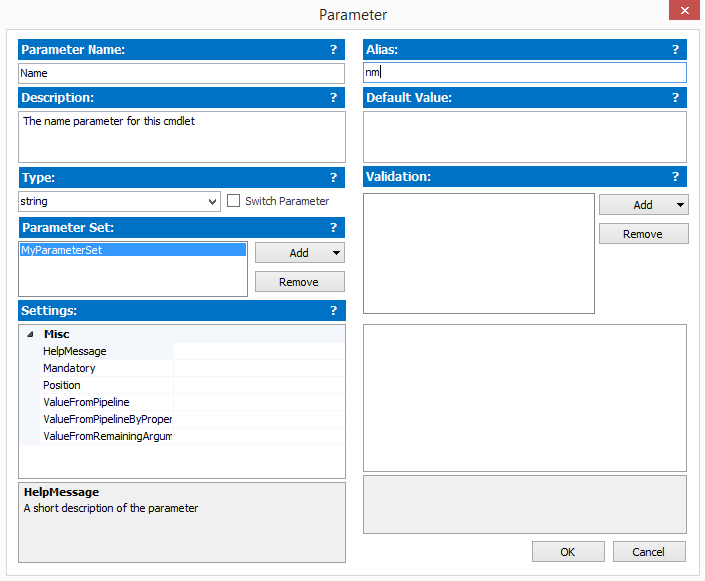
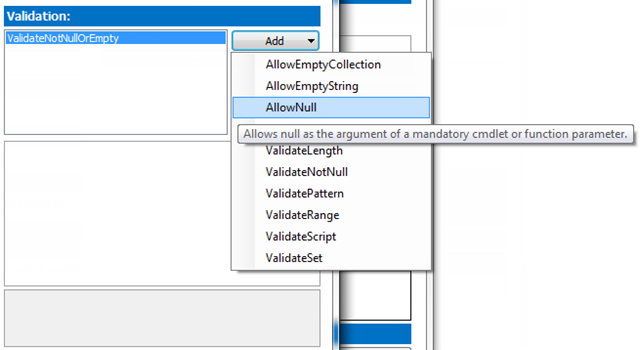
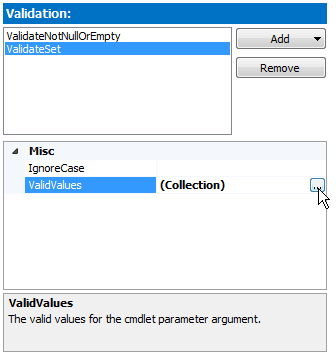
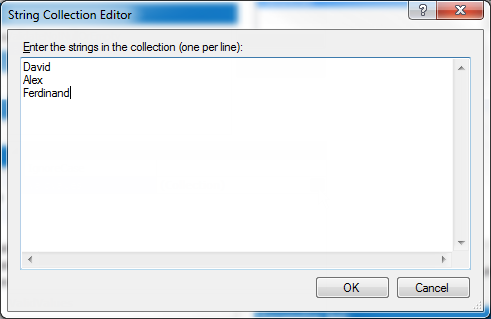
Use the parameter editor dialog to edit the details of a specific parameter such as adding validation and aliases.
Once you have added all of the parameters and entered the information required, press the OK button in the Function Builder dialog. Now you have an advanced function ready to go:
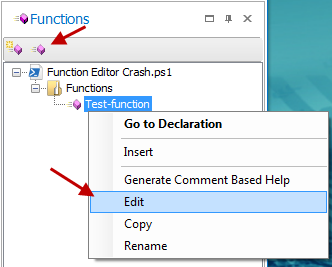
There are four different ways to edit existing functions.
-OR-
If you select a section of script when inserting a new function, the Function Builder will use the selected text as the body of the function. In addition, the Function Builder will pick potential parameters and present you with the following dialog:
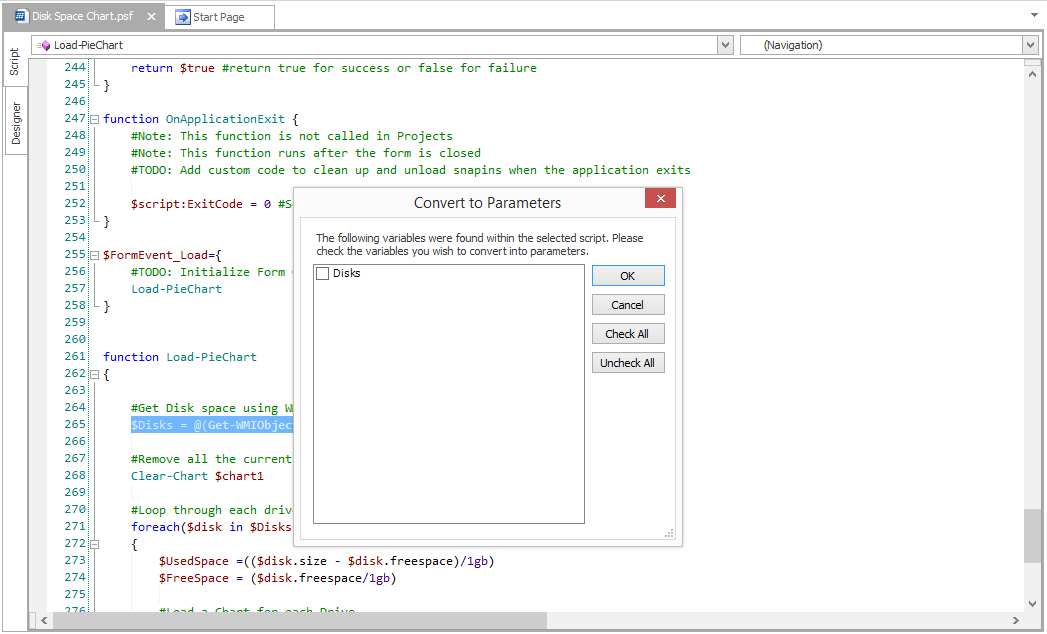
In this dialog, you can select the variables you wish to convert into parameters.
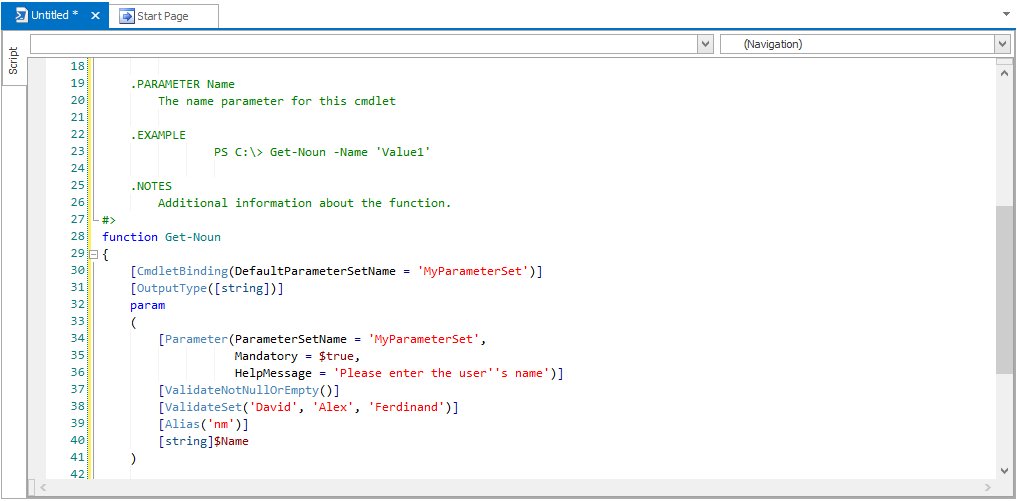
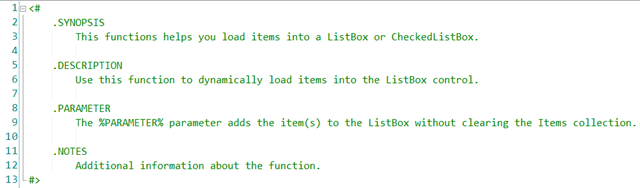
PowerShell Studio has the capability to automatically generate comment blocks for existing functions. You can generate comment based help for an existing function by:
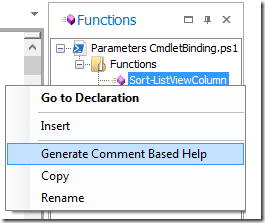
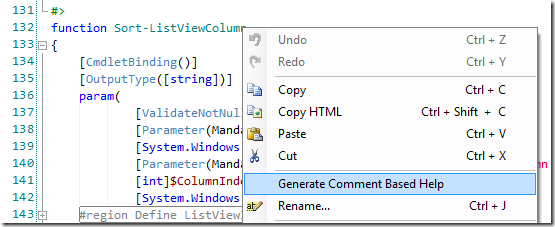
The Generate Comment Based Help command will insert a help comment tailored to the specific function. The comment will include a .PARAMETER entry for each parameter declared in the function, include an .EXAMPLE entry and add any applicable output entry:
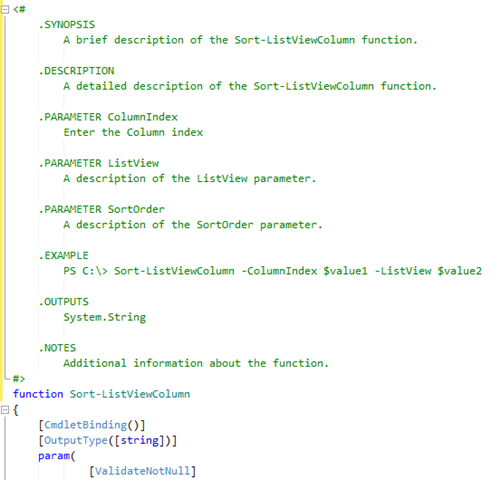
You will still need to supply the descriptive text, but the structure is there for you to update and edit.
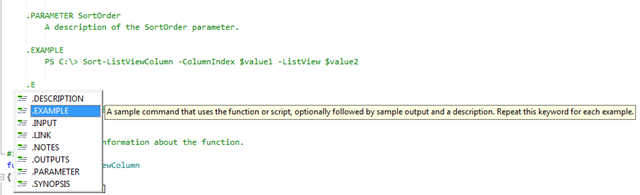
If needed, you can expand on the help comment with the help of PowerShell Studio 2015's PrimalSense:
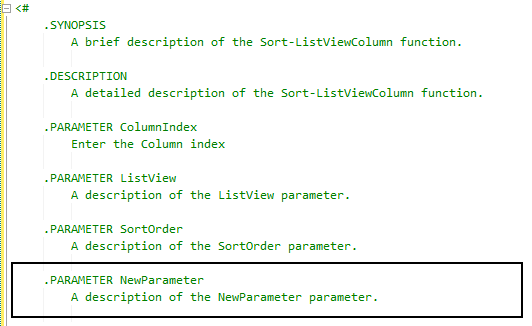
At one point, you may add a new parameter to an existing function and need to update the help comment. By calling Generate Help Comment again, it will take any existing help comment and append any missing parameters to the comment block:
Renaming Functions
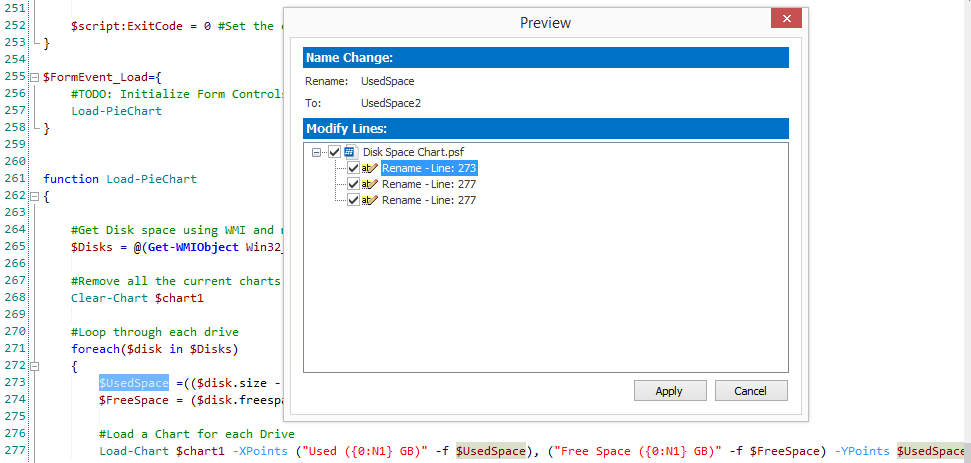
When you rename an existing function in the Function Builder, PowerShell Studio will bring up the Preview Changes dialog. Here you have the option to select which of the function references you wish to update in the script.Comment-Based Help
This Function Builder will insert a Comment-Based help block only if you fill in a help field in the Function Builder. This includes all the Description and Synopsis fields.Comments in the Parameter Block
If the Function Builder encounters any comments in the function's parameter block, it will automatically assign the comment to the parameter's description. All parameter comments will be moved to the comment-based help block.Name Validation
The Function Builder will validate the function's name by checking if it already exists in your script, thus preventing duplicate functions.

Undo Changes
If you are not happy with the changes made by the Function Builder for any reason, you can always undo the changes directly in the editor (Ctrl+Z).
PowerShell Studio features the ability to create templates for the comment-based help generator. It comes with a predefined template that contains the following:
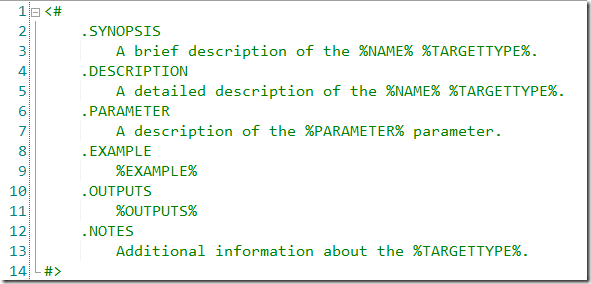
The template file contains the typical comment-based help block with some token variables and a single parameter section. When the user generates comment-based help for a function or file, PowerShell Studio will read the template file. Depending on if the function already has comment-based help, it will behave as follows:
If comment-based help is not present:
PowerShell Studio will insert all the sections in order, as defined by the template.
If comment-based help is present:
PowerShell Studio will check whether each section within the template is present in the existing comment and insert if necessary. In addition, the existing comment's sections will be reordered to match that of the template's.
NOTE: Empty sections will not be inserted. For example, if OUTPUTS section in the template above is empty after replacing the variables (the function has no output), PowerShell Studio will ignore it instead of inserting it into the comment.
The template only contains a single parameter section that defines each new parameter's text. Notice that there is no parameter name after the section. When PowerShell Studio encounters the Parameter section in the template, it will place all the function's parameters sequentially within the comment block.
For example, in the template shown above, all the parameters will be inserted after the Description section and before the Example section.
PowerShell Studio always contained templates for various file types. In previous versions, users who wanted to change the template had to manually edit the existing template files. Unfortunately whenever the user updated the application, the installer would uninstall the application before applying an update, thus losing any modification made to the template. As a result, we added a new Create Template feature to PowerShell Studio that not only makes it easier to create templates but also preserves them after application updates.
To create a template you can create a new file or simply open an existing template or file. Then use the Create Template option in the Ribbon's file menu:
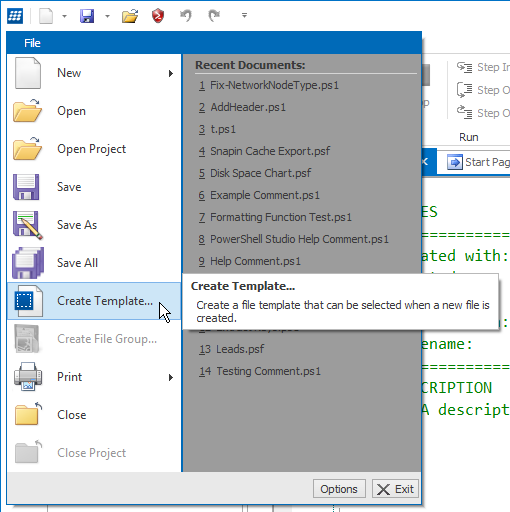
Then you are asked to save the file template. Template files are simple text files that are located in the following user folder:
C:\Users\<username>\AppData\Roaming\SAPIEN\PowerShell Studio 2015\FileTypes
The file type must have the same extension as the file type you wish the template to be applied to. For example, a file named UserTemplate.ps1 will only apply to .ps1 script files.
PowerShell Studio also provides four predefined templates for script files, which can be located in the following folder:
%ProgramData%/SAPIEN/PowerShell Studio 2015/Templates/FileTypes
The following are template variables that will dynamically be expanded by PowerShell Studio when a comment section is inserted:
|
Variable |
Description |
|---|---|
|
%NAME% |
Inserts the name of the function or file. |
|
%TARGETTYPE% |
Inserts "function" if the comment is for a function.
|
|
%PARAMETER% |
Inserts the parameter name (Only valid within the Parameter section). |
|
%EXAMPLE% |
Inserts a generated example using the existing parameters. |
|
%OUTPUTS% |
Inserts a list of outputs determined by the Output attribute. |
You can also use the standard template variables as well:
|
Variable |
Description |
|---|---|
|
%AppName% |
PowerShell Studio name |
|
%AppVersion% |
PowerShell Studio version |
|
%Username% |
The user name specified in the settings. |
|
%Company% |
The user company name specified in the settings. |
|
%Year% |
Current Year i.e. 2014 |
|
%Date% |
Current Date i.e. 5/12/2014 |
|
%Time% |
Current Time i.e. 2:17 PM |
|
%FileName% |
Inserts the file's name. This will be empty for new non-project files. |
|
%ProjectName% |
Inserts the file's project name. |
|
%GUID% |
Inserts a unique GUID. |
PowerShell Studio allows you to define multiple templates, so that you can apply them to specific situations. When more than one template exists, PowerShell Studio will present you with the following selection dialog:
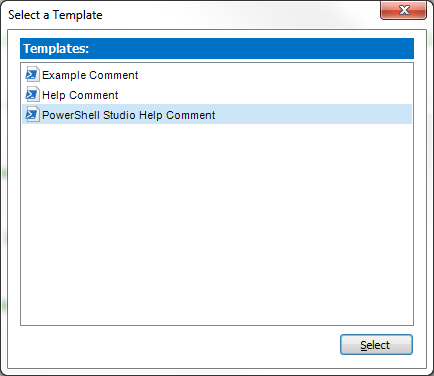
Use the dialog to select the desired template to be applied.
The comment-based help templates support either single line comments or multi-line comments. So for those of you who prefer to use single line comments, you can also create a template using single line comments and when applied it automatically converts an existing multi-line comment to single line. If you have a multi-line comment template, it will convert the existing single line comments to a multi-line comment.
Note: A template's formatting is not taken into account when generating comment-based help.
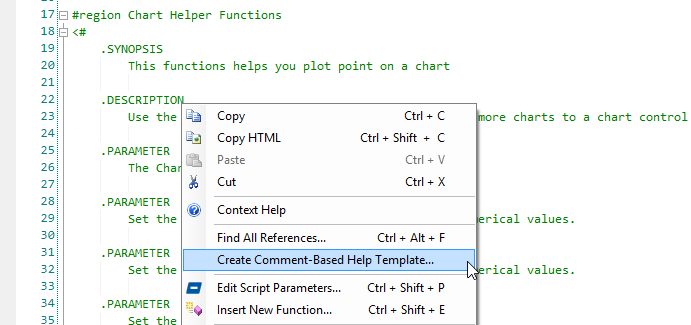
Creating a template is easy. Simply right-click on the comment-based help you wish to convert into a template and select the Create Comment-Based Help Template option from the context menu:
Next, you are presented with a file save dialog:
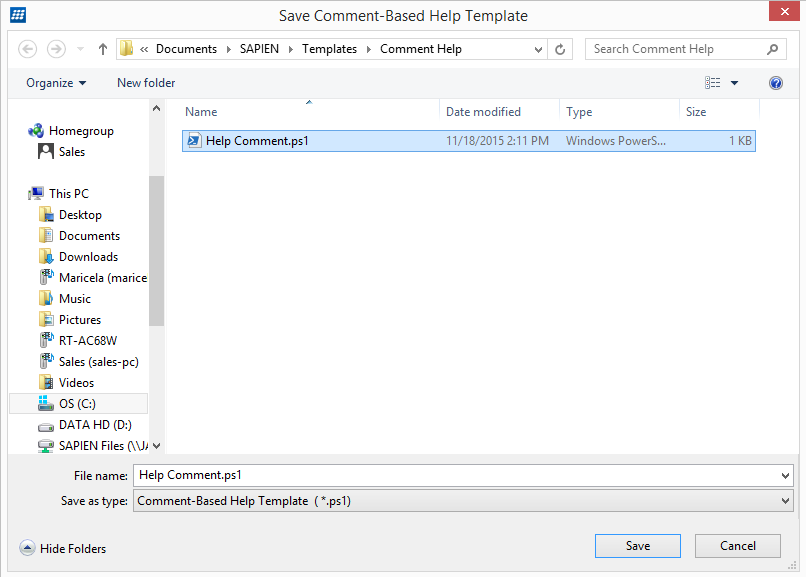
Save the template with your desired name. The resulting template file will be saved as a ps1 file in the following folder:
C:\Users\<username>\AppData\Roaming\SAPIEN\PowerShell Studio 2015\Templates\Comment Help\
If the original comment-based help has one or more parameter sections, PowerShell Studio will automatically format the Parameter section for the template:
Now simply edit the file to include the necessary sections, variables and text. To apply the changes, save the template file as you would normally any normal script.
![]() You can generate a new template from an existing template using the same procedure described above.
You can generate a new template from an existing template using the same procedure described above.
For example, you can open PowerShell Studio's predefined template and use that as a starting point.
Note: The predefined template is located in the following folder:
C:\ProgramData\SAPIEN\PowerShell Studio 2015\Templates\Comment Help
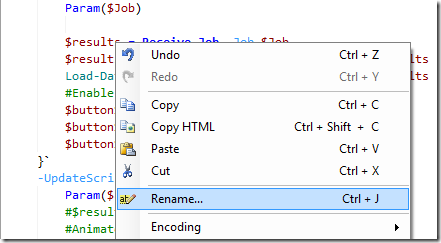
Rename refactoring allows you to intelligently rename variables, controls, parameters, functions and more. You start by right-clicking on the object you wish to rename to bring up the context menu. Then select Rename… from the menu:
You will then be presented with the rename dialog:
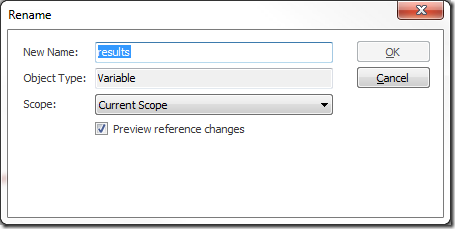
Let us delve deeper into each field:
| Object Type | Description |
|---|---|
| Event | Updates the event variable and references in the designer |
| Function | Updates function declaration and function calls |
| GUI Control | Updates the GUI control variables and updates any event name and return variables for projects |
| Parameter | Updates the parameter for the function and any calls using the parameter |
| Variable | Updates variables within the document that aren't a parameter or GUI control |
| Scope | Description |
|---|---|
| Current Scope | Rename refactoring only occurs within the scope of the current function or event block |
| Current Document | Rename refactoring will occur for all instances of the object within the current document |
| Entire Project | Rename refactoring will occur for all instances of the object within the project files |
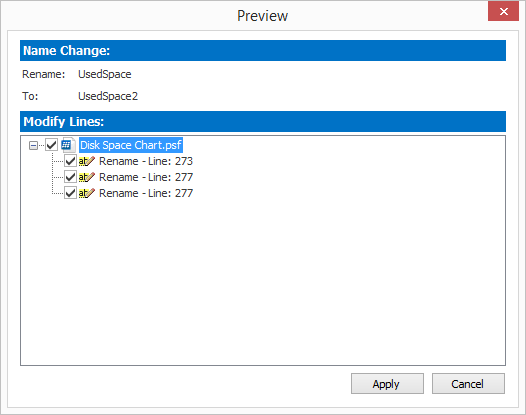
Here you can preview the changes by clicking on any item in the list.
To match the rename refactoring, our Reference Highlighting takes into account the different ways variables and parameters are references:
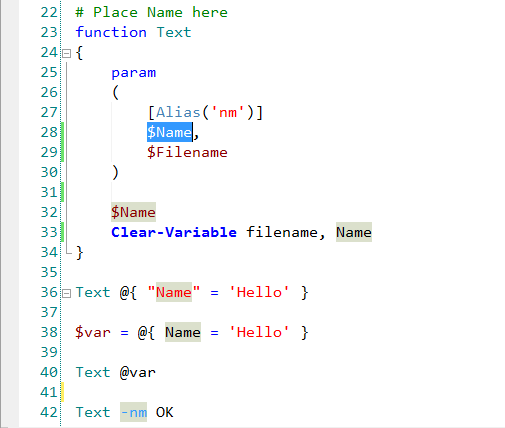
You can trigger Reference Highlighting by double clicking on any object in the editor.
Rename refactoring can be extremely useful when dealing with multiple files as in a project, because it will update all the project files (with the exception of excluded files):
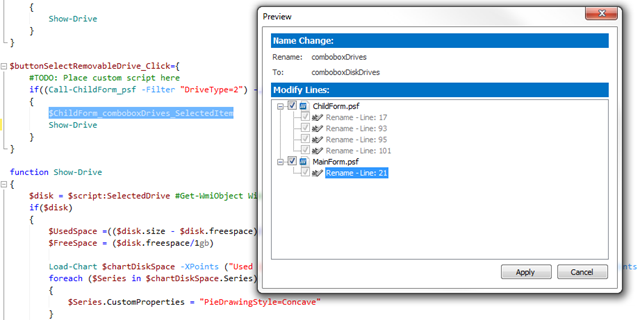
In PowerShell Studio, return variables are updated when a GUI control is renamed. In addition, when you rename a project file in PowerShell Studio, all the reference functions and return variables are updated to reflect the new file name.
![]() If you include ps1 files as content and dot source the file within a project, calls to functions defined in the dot sourced file can be updated using
rename refactoring.
If you include ps1 files as content and dot source the file within a project, calls to functions defined in the dot sourced file can be updated using
rename refactoring.
The rename refactoring feature can be a big time saver when renaming events, variables, functions and other objects. In addition, with the preview you can quickly see where the object is used and selectively decide if you want to go forward with any change.
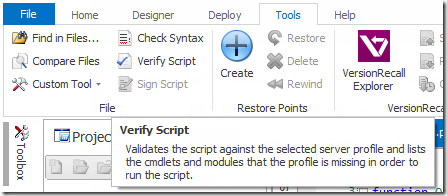
PowerShell Studio offers a mechanism that allows you to verify that your script will run on a specific remote server machine, by comparing the cmdlets and modules used in the script with those available on the remote machine. The Verify Script command will then produce a report listing all the missing modules and cmdlets on the selected machine.
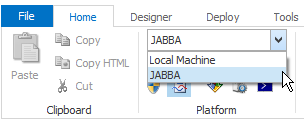
Start by selecting the appropriate machine from the Platform section in the Ribbon's Home tab:
If you wish to select a remote machine, you will need to import the remote machine's cache beforehand.
Next, go to the Ribbon's Tools Tab and press the Verify Script button:
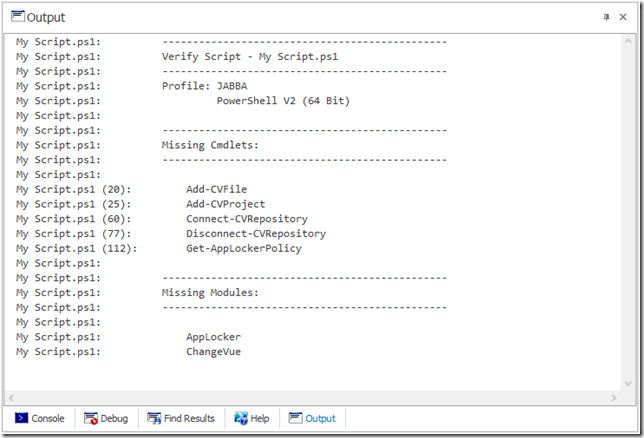
PowerShell Studio will then evaluate the script and display the results in the Output panel:
PowerShell Studio's editor offers a visual cue as to when a cmdlet is unknown:

As demonstrated, Verify Script offers a quick and simple way to verify that your script is capable of running on a remote machine. Even though PowerShell Studio identifies unknown commands as you type, the Verify Script makes it easier for you to determine the necessary modules for the script to run.
The Parameter Builder introduces a quick and easy way to insert a new parameter block or edit existing script parameters. Now that you are familiar with the Function Builder you will recognize the similarities between the two tools, with the exception of the Name portion of the builder. Otherwise, the Parameter Builder and the Function Builder share the same functionality.
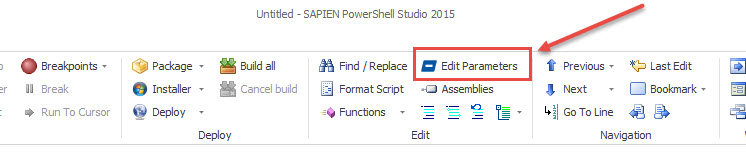
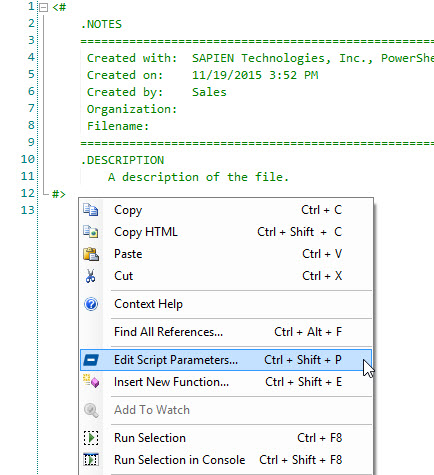
You can access the Parameter Builder in three ways:
Just like the Function Builder, you can specify the parameters, parameter sets, validation, and help comments:
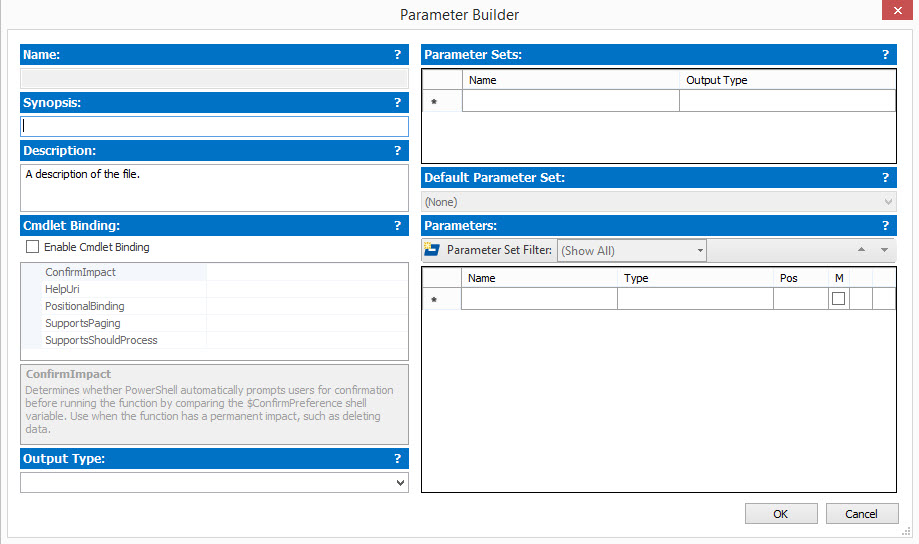
When you are done editing the parameters, it will produce a parameter block for your script.